Showing posts with label Carburettor. Show all posts

Sunday, 13 August 2017

Carb Gasket Problem

First post for ages! The Cobra was still plagued by the instantaneous lean spike when you very slightly touch the throttle. I'd almost tuned it out by just running everything else rich and sort of tried to live with it. Finally decided something had to be done and I wondered if I had too much primary transfer slot showing, which is a common thing I found from a few quick Holley and muscle car forum searches.

My transfer slot exposure at idle was a little bigger than the normal recommended max 0.040" but not far off. I set the front and rear idle to show even slot exposure and put it back together to go for a test drive. While I was at it I thought I may as well put a fresh metering block gasket on as the old one had been on and off the carb a few times and was looking a bit tired.

Went for a drive and good heavens it was terrible. Blubbery, big lean spikes touching the throttle, massively rich everywhere. Spent a whole afternoon driving and tinkering with idle mixture/idle throttle position and air bleeds. It just would not make sense and respond how I would expect. I sort of got it half decent and gave up.

Next day went for a long drive. Again very bad running, fat and blubbery as if it was massively rich. AFR gauge was showing high 12's on cruise but the car felt very very sluggish and was bucking and jerking at low revs. Lazy to accelerate and generally piss poor.

Got to my destination and thought right then lets have a look. With the engine off I looked down the throats just to check the throttle positions at idle and check I hadn't made a complete bodge and I noticed the top of the right hand side (UK driver's side) primary throttle plate was wet with fuel. I then noticed bubbles coming out of the timed vacuum port that sits just above the throttle plate in the closed position. Hmm! Then I started having a good look at everything and noticed that the clear plastic vacuum line that goes to the vac advance cannister was full of fuel. Very odd! Over the next 5 mins I observed more bubbles coming from the vac port and the throttle plate being constantly wetted by a dribble of fuel. The primary fuel bowl was slowly emptying itself.

More investigation required! I took the primary fuel bowl and metering block off and had a good old poke around. I was particularly interested by the hole in the gasket that didn't match up with anything. On closer inspection the hole just very slightly exposed the fuel feed channel from the right hand jet (circled in red below)


The red circle on the metering plate below shows the fuel channel that the mystery gasket hole slightly uncovers.


Looking at the gasket above you'll see there's an impression in the gasket where its been next to an opening on the other side, i.e. the main carb body. Looking at the body that was easy to identify, the oval opening circled in red below:


By attaching some hose to the timed vac port and blowing through it, I discovered that oval port marked in red above is directly connected to the timed vac port, which means there was a direct path from the fuel bowl - through the metering block, through the mis-placed hole in the gasket and straight to the vac port, all below the fuel level. This is why it was dribbling out even when the engine wasn't running. Just imagine the complete chaos this was causing to the fuel mixture and distribution in the carb! This explains why it was running terribly. Even with my single plane manifold, cylinder 5 and 6 were probably getting a completely awful mixture and the other cylinders getting a compromised but just about ok mixture. 

My lambda sensor is on the other exhaust bank so that read somewhere in the normal range and didn't show up this problem.

Because this mystery extra hole was only on one side, I was able to flip the gasket over so it now blanked off the oval hole in the body. The mystery extra gasket hole now slightly overlaps the left hand fuel feed, however in the carb body its just a blank wall so it can't go anywhere.

The metering block has locating pins so I had to cut a new hole in the gasket to line up with one of the pins. I have no idea what this extra hole is for but the gaskets I bought are genuine Quick Fuel gaskets. I don't know if they are front/rear and I've got them mixed up, I thought they were all the same so I'll check that later.


I reassembled and turned the car on but didn't start it (fuel pump on) to check there was no fuel dribbling from the port. Success! and no fuel in the vacuum pipe. A promising start. Fired the car up and started to twiddle with the mixture screws. Didn't take long to find the peak vacuum, about 12.5 to 13 inches at about 950-1000rpm. The AFR was in the usual range of mid 13's so nothing unusual there. I left everything else the same. Previously I had the IFR at 0.031" for a reasonable 2000-2500rpm cruise mixture (on transfer circuit) but I had recently put the IFR to 0.032" to cover the lean tip in problem.  Previously this had resulted in an OK but generally rich (high 12's) low rpm cruise that I just lived with to cover up the lean tip in.

I got the car on the main road to cruise and it was really really lean at around 15-15.5:1 AFR when cruising between 2000 and 2500rpm, leaner at the bottom end. I stopped in a handy layby. I didn't fancy changing the IFR's at the side of the road but I did have a selection box of air bleeds. It had 0.073 in so I swapped to 0.069 idle air bleeds. Small adjustment to the idle mixture again for highest vacuum and got back on the road again. 

I know that reducing air bleeds makes the circuit start sooner as the fuel can be drawn with a lower air flow (imagine holes in a straw), so reducing the idle air bleed would slightly richen the over all transfer slot AFR and would make it more active sooner. The result was an 1800-2500 cruise mixture of 14 to 14.5:1. Below that and it all went a bit rich so I think there is a bit of overlap from overly rich idle mixture merging into the start of the transfer slot but I can sort out that later. There also seemed to be a little bit of a gap between 2500 and about 2700 when the mains really start flowing so perhaps the main idle bleed needs reducing to make the mains come in a little sooner to take over when the transfer slot finishes. 

Even better - the lean tip in from moving the throttle a couple of mm has completely disappeared! I'm not sure exactly why this is, because the mystery extra hole in the gasket was allowing fuel in, not air, so it wouldn't have been acting as an air leak. Maybe there's some internal channels and holes in the metering plate or the carb that made it behave that way but now its amazingly completely gone!  It's transformed the way the car drives. Just a small touch of the throttle and instead of a lean spike and a bog, the mixture just smoothly transitions to mid 13's and the car accelerates smartly. Super pleased!

Edit: Thanks to some knowledgeable people at cobraclub the mystery gasket hole was identified as being the standard Holley position for the timed vacuum port channel that feeds out the side of the metering block. On Quick Fuel carbs its in the baseplate. It looks like QFT supplied me with standard Holley gaskets which aren't compatible with my QFT metering block. Its interesting that the QFT main body (with QFT logo cast in the body) is the same as a Holley and retains the timed vacuum channel to the metering block, even though it is redundant.

Friday, 27 March 2015

Edelbrock Thunder AVS 650 Idle Channel Restrictor

I decided to perform a popular mod to my carb that I have read a lot about and that is increasing the size of the idle channel restrictor.

It is well documented that the Eddy carbs flow barely enough fuel in the idle/transition circuit to cope with big cams. I've experienced this through the various low speed running problems. I can see from the AFR that there simply isn't enough fuel at low RPM and there is a lean surge problem.

Closing the throttles and drilling holes in the throttle blades to make the transition circuit more active helped a little bit but the trouble is that the transition circuit is fed through the idle channel restrictor so this needs to be enlarged. In Holley type carbs, Quick Fuel, Demons etc, the top-end carbs have all sorts of changeable air bleeds and jets all over the place which can be easily swapped. On the Edelbrock however its a drilled channel so the only solution is surgery. It would be possible to drill and tap and replace with something adjustable by my approach is to make tiny changes until I notice a change and leave it at that. The risk of course is going too far then changes aren't reversible if you are drilling holes.

Here is the offending area of the carb as per the Eddy manual (note 5) :


It can be accessed by unscrewing the air horn and then removing the booster assembly that sits in the idle well. You will have to remove the throttle cable and choke assembly as well.


The channel restrictor is hiding behind the pressed-in brass jobby, labelled "idle air bleed" in the manual. Removing this is easy-peasy, get a self tapping screw and wind it in to the brass restrictor then just pull it out with some pliers, in fact one of them came out by hand.


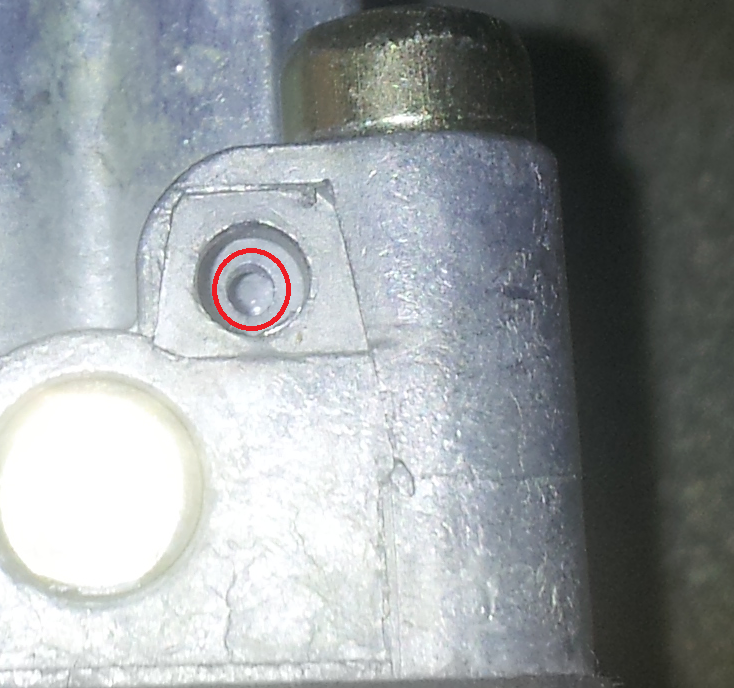
You can now see the small hole that was behind the brass restrictor. This is the ICR that we are after.


Just so we are absolutely sure what it is we're drilling, here's a close-up with it circled in red:


It's now possible to get in with a drill and open up the orifice. I don't know what size it is to begin with but I ran a 1.5mm drill through which opened it up a small amount, it didn't remove much material. Its probably best to use numbered drill bits to 1) accurately measure what it is to begin with and 2) be sure of what size you are going to and make SMALL changes - I know its a bit hypocritical saying this when I just picked up a small bit and ran it through but the point still stands, when enlarging very small holes you can make massive differences in terms of % from what seems only a small increase in diameter.

Don't forget to do the other booster before you reassemble!

Anyway - the result, I'm pleased to say I can actually feel it and can see it on the AFR gauge. Without changing the idle screw settings, the idle AFR had richened up a little bit from 13.8:1 to about 13.5:1. This means that the idle circuit as a whole is now getting more fuel. 

When driving, the biggest difference was when plodding along under 2000rpm when the idle circuit is doing all the work. Before this mod I was creeping over 14:1 which was just about ok for constant throttle but if I made very small throttle adjustments of just a few mm on the pedal would send it into lean surge as it was clear the idle/transition circuit wasn't fat enough to give any extra fuel for small modulations on the throttle. These are pedal movements which are too small to get a fuel from the accelerator pump, just a couple of mm slow throttle movement.

Now that I've drilled the channel, the AFR doesn't spike lean and surge when making small throttle movements at low rpm and the general low speed manners have increased noticeably. I can give it a couple of mm throttle just to very lightly pick up speed and the AFR remains below 14:1 and lean surge is avoided so it was definitely worth doing - the way I see it in my head is that the transition circuit now has more "headroom" to cope with the many small changes in fuel demand that occur when you are cruising along gently at low rpm when the main circuit isn't fully active.


Friday, 20 March 2015

Missing Gasket!


The engine seems to have got a bit greedy and chomped a bit of carb gasket! More investigation required!

Update 27/03/15 - After some good thorough carb cleaning the damaged gasket was a false alarm, no lasting damage. Phew!

Monday, 16 March 2015

Edelbrock Thunder AVS 650 Secondary Air Flap Tuning

I have struggled to find information on this so I did some experimentation and decided to try and write my own tuning guide in case the weary internet wanderer should stumble on this dusty corner of the web in search of carb tuning tips.

Just to summarise and recap - engine is a 383 SBC, formerly with an Edelbrock Performer 750cfm carb (part no. 1407) and now sporting an Edelbrock Thunder 650cfm carb (part no. 1805).

The Edelbrock Performer and Thunder carbs have mechanical secondaries that open up from roughly 60% throttle opening but they have a flap above them to control when the air starts to flow. On the performer, the door has some weights on it so it opens for a certain air flow (i.e. throttle demand). The secondaries will only be active when the engine needs them. The only way to adjust this is to add or remove weight.

On the Thunder series, the air flap is spring loaded so by altering the tension of the spring, you can tune when the flap opens and the secondaries become active. I've seen the standard setting reported variously between 2 and 2.5 turns of spring tension. I've learned enough so far to never assume anything is set up correctly out of the box so the first thing I did was to unwind the tension and set it myself to 2 turns. At this point, some pictures will probably help.

Here's the carb on the engine with the air filter removed.


Flap closed:


Flap open:


Adjustment - The spring tension adjuster (flat blade screwdriver required) is clamped down with a torx fixing. Loosen the torx screw and you can then adjust the tension. Note that you need to have the flat blade in and hold it firmly before you loosen the torx otherwise the spring will just unwind and you will lose whatever setting the spring was at.


So what effect does adjustment one way or the other have? If you loosen the spring, the flap opens sooner so the secondaries become active quicker. "Great!", I hear you say. "Lets have it on the loosest setting and get more power!"

Sadly this is not the case. Fundamentally, air flow in a carburettor always reacts quicker than the fuel. Changes in fuel flow will always lag behind the air and that won't change. That's why there are things like accelerator pumps to cover the "hole" in fuel supply when you stomp on the throttle pedal. The air rushes in but the fuel flow takes a moment to catch up. The Eddy carb has a primary accelerator pump but no secondary pump (like a Holley double pumper). That's where the air flap comes in.

At the stock setting of 2 turns on the tension spring, if I press the throttle sharply I get a momentary bog or stumble. The engine briefly dies for half a second then picks up. Looking at my AFR gauge, I can see its a lean condition. This is because the engine tries to suck in a load of air/fuel and the spring allows the air flap to open, the air rushes in immediately but the fuel isn't flowing yet to keep the AFR sensible and there is a lean spike, then engine falls flat on its face until the fuel starts flowing, the AFR returns to where it should be, and the engine comes back to life and accelerates happily. If I press the pedal slowly and steadily, the air flap opens slowly, the fuel has time to be pulled to the boosters and the problem goes away, but obviously this is rubbish to drive, having to nanny the throttle pedal all the time.

No amount of fiddling with the primary accelerator pump shot can solve this as it doesn't affect the air/fuel in the secondaries. See my previous posts for pump shot nozzles, actuator linkage adjustment and pump spring upgrades. None of this worked - this is what the adjustable air flap is for. By tightening the spring, the door takes longer to open and while it does so momentarily chokes the secondaries, making the mixture richer. This gives time for the air flow to establish itself and all the clever passages that meter the fuel to start working properly. The lean spike is therefore eliminated, or at least greatly reduced. I like to think of it as the opposite of the accelerator pump. The pump shot gives you more fuel, conversely the air flap reduces the amount of air, but both methods are aiming to stop the mixture from going lean when the secondaries open quickly. The end result should be seamless transition as the secondaries come on. Anyone who says they can feel the secondaries kicking in are probably experiencing some sort of bog or stumble and need to do some tuning work. You should barely notice it.

That's my simplified explanation anyway. 

As far as results go, with the stock setting of 2 turns of tension, I was getting spikes up to 18:1 on the AFR gauge before settling down to 12.7:1. Obviously this is not good, but the one crumb of good news is that my mixture is ok at WOT once things have settled down. I started winding on the tension and ended up at 3.5 turns which brought the lean spike down to 15:1. Cruise seems to be anywhere between 13.5:1 and 14:1 depending on rpm so a momentary blip to 15:1 is barely noticeable but is still there. The engine doesn't die but you can still feel it hang momentarily after changing gear.

The only problem I have now noticed is that if you floor it from below 2000rpm in 5th gear, the engine can bog rich. I think this is because the air flow is not enough to overcome the increased spring tension on the air flap and it stays in the "choked" position. The engine wants more air but it can't get it until the rpm rises, the air flow increases and then the door opens. In lower gears this doesn't happen because the revs rise so quickly. On the open road when you're going along at 50 in 5th and want to overtake someone, its extremely annoying because I have to either roll gently into the throttle or change down a gear and this completely ruins the car. Whats the point of having a massive V8 with mountains of torque down low if you have to keep changing gear all the time?! I backed off the air flap tension and this problem goes away, but then the lean spike on flooring it and changing gear returns.

Conclusion and lessons learned

Since doing this investigation and later on moving to a Holley carb, I have learned a few useful things. Part of the reason this Edelbrock carb didn't really work for me was my engine spec and the nature of my car. 

I am not saying Edelbrock carbs are bad. What I am saying is they are better suited for a particular application. Both my Performer and Thunder carbs were very good for cruising around once I had got them set up properly. I got good fuel economy at around 18-20mpg and after my tweaks to the idle channel restrictor I had very good low speed manners and a sharp part-throttle response. They would be ideally suited to a heavy car with long gears, or automatic transmission, stock or mild cam and dual plane intake designed to give high torque straight off idle 

What the Eddy carbs are perhaps not best suited for is a very light car with short gears, manual transmission, a big cam and single plane intake designed for higher rpm. A solution exists for cars like mine and its called a Holley Double Pumper.


Sunday, 1 March 2015

Carb Accelerator Pump

After doing lots of research I found some interesting information about Edelbrock carbs and the lean bog that they seem to suffer from when mashing down full throttle. My car suffers from this, if I press the throttle gently then there's no bog or stumble but if you stamp on the throttle it momentarily dies and takes a moment to pick up. The problem is more pronounced when flooring it from lower revs - something I haven't been able to do until I solved my poor low speed running problems by changing to a smaller carb.

So now I needed to find a way of covering the "hole" in fuel delivery between low speed cruise and WOT. The WOT mixture is good at around 12.7:1 but there is a nasty spike up to 16:1 or even 17:1 where it stumbles and dies before picking up again if I floor it sharply. First port of call was the accelerator pump. On the Eddy carbs you can adjust the linkage to give more or less pump volume. The picture below shows the linkage attached to the plunger in black with 3 holes to choose from. Stock, the linkage is in the middle hole. For more pump shot move to the top hole, for less, the bottom hole.


This didn't have much effect so I started messing around with shooter sizes. Edelbrock do an accelerator pump nozzle kit part no. 1475 which has a variety of sizes. You can just see the nozzles below above the venturi throat with "31" stamped on. This is the nozzle size in thousandths of an inch. The nozzle kit has several sizes up to 0.043" (43 stamped on top).


I swapped to the largest nozzle size which also failed to solve the stumble. The extra fuel just doesn't get flowing soon enough. What I think I need is a more active pump shot. I noticed that I have to move the throttle quite a bit to get anything out of the pump nozzles. The spring on the pump plunger is quite weak so this gets compressed first before pushing fuel out. Luckily, Edelbrock do an uprated accelerator pump plunger with a much stiffer spring, part no. 1468.


With the new plunger fitted, the nozzles squirt fuel with the tiniest movement of the throttle so hopefully that might improve things. Won't get a chance to drive the car until next weekend to find out though.

Update - this did nothing to cure the lean spike which I have now identified is to do with the secondary throttles opening quickly. Thankfully there is a way to tune this out but information is a bit lacking in this respect. See the next post for the solution.


Friday, 23 January 2015

Choke!

I realised last night that the last time I drove the car was on Christmas Eve when I drove a mate to work. I normally cycle to work and was fed up of being battered by wind and frozen to death so I decided to go to work in the Cobra today. I realise that "being battered by wind and frozen to death" also applies to a car with no roof and no heater to speak of but still, a change is as good as a rest, so they say.

I've left it stood for more than a month before and its started immediately with the normal procedure, one long pump of the throttle, then hold the throttle halfway and turn it over. This morning though, it absolutely refused to start. I could get it to splutter holding the throttle fully open but nothing could coax it into life. Eventually I had to admit defeat and use the choke.

There is no choke cable fitted and I've never had to use it before but it was -4°C in the garage and I've never tried to start it from as cold as that. I think the coldest I've used it is probably +3 or +4°C. The choke is wired fully open with some reasonably stiff garden wire so I got some pliers and bent it so the choke was closed. The car then started immediately, and I mean I had barely touched the key and it was alive. I left it for 20 seconds or so and it was idling on its own so opened the choke again, locked it off and jumped in quickly before it died (no fast idle). The car was then happy, used it at lunch time to take a colleague out for a quick spin, and it also started first time coming home even thought it was -1°C.

I don't know why I'm constantly amazed that it works, hundreds of millions of other cars around the world start every day but it still surprises me that a car we built ourselves works in everything the British weather can throw at it.

Driving was a different matter. I've driven in rain, damp and fairly cold but never below zero before. Man alive! It's twitchy round the corners! even pulling away at a T-junction, lift the clutch with no throttle and it slides sideways. I knew it would be a bit sketchy but it was absolutely ridiculous. At lunch with my colleague in the car I picked the driest, straightest piece of road I could find and gently squeezed the throttle in 3rd gear from 1500 rpm. It was fairly controllable until the cam really comes on at about 3000rpm and the back end lit up.. Luckily my passenger is a veteran of Ariel Atoms and similar so he wasn't too worried. Eventually I got the hang of it, if you know its going to step out then you can be ready for it and to be honest, the car pretty much sorts itself out and makes you appear a much better driver than you are.

At junctions and roundabouts, there's something about the De Dion rear end that's very forgiving and breaks away nice and gentle at low speeds (i.e. below 25mph or so). Not unsurprisingly I don't tend to stab the throttle like a madman in the middle of a corner on a public road going at any reasonable pace so I can't describe what its like at higher speeds.

On the way home I slipped into my familiar paranoid mode and thought the steering felt a bit vague so tomorrow morning I might just jack it up and have a poke underneath but I expect its just the bumpy road surface and the fact I haven't driven it for a while so I'm not used to it.

Sunday, 28 September 2014

New carb continued....

A few other things I've noticed now I'm running the Eddy Thunder AVS 1805 carb (650cfm) over the 1406 Performer (750cfm).

I checked it over before I installed it to adjust the floats and idle speed to standard (floats a little off out the box) and checked what rods and jets were in. Compared to the 1406 Performer carb its a little more difficult to change the rods. Not a lot, but things are a little more cramped at the top of the carb so its more fiddly. The piston that the rods fit into doesn't quite clear the screw of the little screw-down cover plate without a bit of care taken which turns a 2 minute job into a 10 minute job.

Here's what I mean:

1706 Performer, loads of room here to swing the cover plate out the way and get the rod and piston assembly out easily.

1805 Thunder AVS has a different shape surrounding the choke, almost reversed. There is a high lip that goes across the centre which means to get the rod and piston out you have to completely remove the cover plate and screw which adds a bit of time, and adds to the risk of dropping bits down the carb. I much preferred the simplicity of undoing the screw a couple of turns and swinging the plate out the way.


You can also see above the Thunder has got dual fuel feed (one on either side) unlike the performer which is UK driver side only. Seeing that I already had the fuel line plumbed in for the drivers side this didn't bother me but is useful to know. I don't yet know how the car will behave in hard turns but with the previous carb it would bog rich on very hard turns and hard stops. 

One benefit of running an AFR in the 13's at cruise instead of waving around between 14.5:1 and as high as 16:1 is that the engine runs 5 degrees cooler. Previously I was seeing that at prolonged periods of 30 or even at 40mph when I'm forced to do 2000rpm to get a smooth ride the temp gauge needle would creep over 90°C to approx 95°C. Its hard to tell exactly as there are very few increment marks on the gauge. It now sits just below 90°C in all conditions, dropping a little more if cruising over 60mph.

We brought the throttle pedal end stop up a couple of mm to prevent the throttle cable being stretched and the butterflies being damaged. This is a bit awkward, its just an M12 bolt through the front of the footwell but needs someone in the footwell and a helper with their hands stuck between the headers and the brake servo in the engine bay. The travel required on the cable on the 1805 for some reason seems to be about 3 or 4mm less than on the 1406. Not quite sure if this is actually a difference between the carbs or if something has changed on the cable route somewhere. Might look into this a little more.

Still a couple of other things to give attention to - I happened to look down the primaries with the engine running at idle and I could see a couple of drips coming from the primary nozzles which means the throttle is open a little too much at idle. The transition slot should appear square when the throttle is closed but mine isn't perfect as it needs a more throttle to idle because of the cam.


The engine runs on (diesels) ever so slightly, just one or two turns after switching off the key so these two things are likely related to the idle throttle position just being a hair too much. I think there is some leeway on the idle speed - now that the carb responds properly to changes in tune, I can revisit my timing and then coming back to the carb again. Perhaps I could add another degree of timing at idle which would allow me to close the throttle a little more. I'm not currently 100% confident in my cheap timing light so I've borrowed a good snap-on one from a friend to verify the timing.

Carbs - dont go too big! (running problems solved)

After being sent away for work and a few other things it's taken ages to get round to giving my 650cfm eddy thunder carb a whirl. This weekend I finally had chance to see if it solves the running problems at light throttle that have plagued us from the very start.

Short answer: Yes! The engine now runs a lot more smoothly at lower revs. It's still not great below about 1400rpm but the improvement elsewhere is night and day. I may need to look at the timing to squeeze the last bit of improvement but for now I'm happy.

Long answer: The carb came with 6847 rods and 095 jets (primary). I set the throttle so the transfer slots were square (as the manual). Floats were a little off but they are easy to adjust. Idle screws starting point is 1.5 turns out.

Put it on the car and fired up, once the float bowls had filled it started easily but wouldn't idle, we had to open the idle speed up quite a bit which concerned me a little as I knew this means the idle transition would be less effective. 10 minutes fiddling with idle speed and mixture we got it idling at 1000rpm but the AFR gauge said 18:1 (max reading) at idle. It would drop if the throttle was blipped but stayed at 18:1 at idle. Even with the idle screws out 4 turns it still said 18:1. I decided this had to be wrong as the engine was idling comfortably with 10" vacuum at 950rpm. It wouldn't be able to do that if it was as lean as the gauge said.

After some headscratching I thought "stuff this. Lets see how it drives". As soon as I reversed off the driveway I knew it was better and once I turned onto the main road I was very very happy. I cruised along in 4th gear, 30mph 1400rpm and it was nice and smooth. The exhaust sounded ridiculous of course, burbling and chuffing away but finally the sub-2k rpm surge was gone!

There's an industrial estate down a quiet road behind our house so I stopped down there for a further fiddle to reduce neighbour annoyance and quickly got the idle to 900. I then noticed that the AFR gauge suddenly started reading something sensible - 12.8 at idle.  I have no idea what it was playing at in the garage with the erroneous 18:1 but its fine now.

Chugging around below 2000rpm and the AFR is about 13 but when accelerating very gently it just rises up to 14:1. It's just on the very edge of a lean surge so a tiny bit more tweaking is required but its so much better than it was. Over 2k and its low 13's (as the influence of the idle circuit diminishes and you get full on cruise) then mid 13's on power when the vacuum is below 5". I haven't tried full throttle yet as the throttle travel seems to be slightly less on this carb so I didnt want to stretch the cable. I can adjust the throttle end stop a couple of mm.

I think I can go at least one stage leaner on cruise and possibly lean off the idle a quarter of a turn but it seems to like a rich idle probably due to the cam overlap. When I do that, and sort the throttle stop out I can see what WOT is like and see if there is any bogging. EDIT - I later discovered there is a bog issue. See my Secondary Air Flap post for how to eliminate a WOT bog with this carb.

Over all I'm very pleased. This 1805 eddy thunder carb has worked pretty much straight out the box with the minimum tuning which is explained very clearly in the manual. The smaller primaries compared with the 750cfm mean that the air velocity is much higher and the fuel mixes better ( at least that's how I understand it) and the fuel metering at small throttle openings is much more reliable and stable. It starts to struggle below about 1400rpm but at the moment I don't mind that at all. I can now chug along at 35 in 5th gear and not be thrown out of my seat. Lovely!

Of course this now exaggerates the fact that my intake and cam are designed for higher rpm so flooring it from 1500rpm is a tad disappointing, as mentioned earlier I think there is more to be had from looking at the timing but generally speaking its so much more pleasant to drive now I feel I can finally enjoy the car instead of constantly worrying about never being able to get it running properly.

Thanks to all on the cobra forum who suggested a smaller carb, you were spot on!

Sunday, 15 June 2014

Carb on fire

Well today was interesting. My distributor advance recurve kit arrived so I removed the distributor to swap the weights and springs. My first mistake was removing the distributor - I realise now I could have done this with it in the car but oh well.

The recurve kit was very badly made and when I put the rotor back on the distributor it wouldn't sit down properly and wouldn't snap back with the spring tension. Original weights and springs back in and the advance mechanism works as it should.

It all started going wrong when I refitted the distributor. I found TDC on cylinder 1 by removing all the spark plugs and turning the engine by hand with my finger over cylinder 1 spark plug hole. You can feel pressure on the compression stroke, I know my TDC mark is correct on the harmonic balancer so that was done. I adjusted the distributor so the rotor was at the cylinder #1 tower in the dizzy cap. Fine so far. I knew the timing wouldn't be perfect but I figured we would get it started then I was ready with the timing light to adjust it.

Started the car, it caught and ran for about 5 seconds then POP and a small flame out the top of the carb. Stopped the engine. I suspected perhaps the timing was too advanced so it was igniting the mixture when the intake valve is still open and blowing through the carb. Pulled all the plugs, rechecked TDC and set the dizzy conservatively retarded (read "most definitely retarded") from where it was.

Started the car again and it immediately went BANG again, this time a foot high flame roared out the top of the carb. I assumed this was bad.

I then went away and read the internet for a while and discovered if the timing is too far retarded you can also have a backfire.

Plugs out again to verify TDC and...... came to remove the plug on cylinder 2 and CRACK, the ceramic insulation shattered. No spare plugs. Early night then.


12 degrees BTDC? Check!


Verify its definitely on compression cylinder 1? Check!


Rotor lined up with wire #1 tower (white paint mark on machined dizzy body) Check! - yet still flames out the carb!

I eventually resolved this, it was just massively retarded. I failed to appreciate the fact that the spark comes when the rotor leaves the contact i.e. the trailing edge. Combine this with the fact that I underestimated how small a rotational adjustment of the distributor is required to start piling on the advance/retard and it's not difficult to be 10,15 or 20 degrees out. Now I know what I'm doing I won't fall in this trap again if I have the dizzy out in the future. I have to keep reminding myself that I've never really done any work on an engine before apart from changing spark plugs so this is all still a learning curve.