Got the radiator in, bit of a faff as its off a nissan 200SX. The rad has tanks top/bottom as opposed to side/side in the dax tank. The nissan tank had some mounting posts with a thread tapped on them, sticking out the bottom but if I used them then they would poke out under the oil cooler scoop which is pretty low as it is. Also due to the height of the rad I've had to angle it backwards, and the mounting cradle fouled on the inside of the scoop so I couldnt angle it back very much if using the mounting posts. So - off they came.
Instead I used the two drilled lugs on the back of the radiator, then bolted through the cradle with some rubber washers on. There is an added benefit of easy access to the drain plug. I then discovered that these lugs are a bit bendy so I beefed it up with a bit of angle firmly butting against the lower tank. I may get a second opinion on this but have the option of adding in some more angle under the rad itself as belt and braces peace-of-mind solution. When the rad was finally installed the upper mounts take a bit of the weight and its all pretty stiffly mounted so it should be fine. TA nice few bends of silicon hose will take up the movement between engine and rad.
The top mounts were the standard Dax mounts, just shortened slightly and bent a bit to suit, not too difficult. The rad is pushed as far over to the near side as it will go so that the lower outlet doesn't foul on the offside lower wishbone. This also helped the clearance on the entry with the bonnet hinge, which is another reason for the rad being angled back otherwise the hose would have to go straight through the hinge. Filler cap is accessible but rendered useless by the header tank, I'll blank off the outlet.
Anyway, enough words, pictures below explain it better.
Lower hose clearance with wishbone, and cradle.
Top bracket and clearance to bonnet hinge (I've checked it with the bonnet closed)
Front view - no rad/cradle showing outside of oil cooler, I feel a lot happier about attacking speed bumps! (although it does mean the next thing in the firing line will probably be the drain plug on the sump)
Edit - I did later take the radiator to a local engineering company and for £30 got them to blank off the cap and replace the rather bendy lower mounting tabs with some much stiffer studs. Post: Radiator Continued
How hard can it be? A blog of a Dax De Dion build and continuous fettling + "improvements"
Sunday, 26 February 2012
Thursday, 2 February 2012
Brake Pipe securing
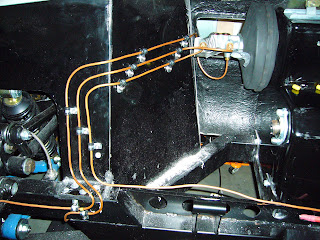
Almost finished of securing the brake pipes. As you can see below the newly painted stealth matt-black brake servo is attached through the footwell bulkhead to the pedalbox. The clevis pin is the wrong size but that's not hard to sort. (beats £150 from Dax anyway)
Attaching the p-clips to the wing was made simple by the wonder of rivnuts. I cant believe I've only just discovered them. Rivets, with a thread in the middle! Who would have known?! Clearly in that picture there is some more clipping to do along the chassis but that's for another day. Also note my shiny new brake master cylinder (£18, cant remember where from) is also fitted and all solid brake lines are fixed in. Also I admit the brake lines themselves aren't perfect but I don't have a proper pipe bender and elected to use sockets and other handy round things. At least this bit of work is done now and we are at last making progress
Bonnet Fitting
The bonnet is now attached -
Not too difficult, the hinge bolts onto the inner wing so we did lots of measuring. I stood the bonnet off the lip with a bit of blutak just to get it lined up nicely then bolted the hinge brackets through.The front of the bonnet did catch very slightly on the lip so a bit of light sanding there and job done.
Subscribe to:
Comments (Atom)


