Thursday, 31 January 2013

wiring

Got to give the ammeter wiring some thought, this is the diagram I got with my gauges.


I bought a fuse/distribution box to link the alternator feed (and separately fuse it) to the rest of the loom, then have a dedicated spur linked with ring terminals to the ammeter, so I can remove it if there's a problem. Currently the main battery feed is part of the engine sub-loom which goes through the bulkhead on the passenger side. This results in a very long run for the main loom feed so to keep this as short as possible I've made an extra hole in the firewall on the drivers side for the main loom battery feed and alternator feed to come through.

Monday, 28 January 2013

Dashboard 2

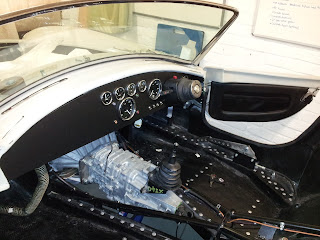
I trial fitted the dashboard and was going to wire it up and have a go but remembered that the connector for the gauge senders on the loom is 8 way but I had to add a couple extra functions on the dash and it needs changing to an 11 way, so I couldn't check the dash worked. Still looks good though.


Just got to close off the gaps left in the side, some thin ali covered in vinyl will do. There is a hole (not yet punched through the vinyl) in the dash at the outer edge to attach the cover piece when I make it.


Dash is supported by a bracket on either side which comes off one of the windscreen fittings, you can just see it below far left painted silver. The dash is fixed at the top in two locations similar to the standard Dax dash. Annoyingly I put one of these in the exact location I wanted my tacho in. The tacho is therefore a bit lower and to the left from where I wanted it, as the indicator stalk now slightly obscures it.


Sunday, 20 January 2013

Remote Oil Pressure switch/gauge sender


 This is the oil pressure sender (big one) and oil pressure switch on a tee-piece which annoyingly doesnt fit under the distributor where there is a 1/8NPT port for this.

The solution was to get 250mm steel braided hose made up by Merlin Motorsport. One end is female 1/8NPT to take the above contraption and the other is a right angle adaptor to 1/8NPT male to screw into the block. The sender assembly was then p-clipped to the bulkhead, ready to take the wires.


Harnesses

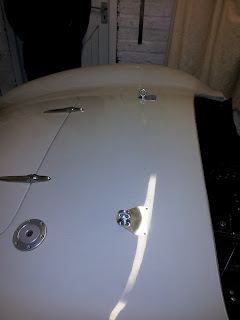
This was a nice job as there's something obvious to show for it. No roll hoops on this car, the tri-leg hoops would normally have the centre leg coming down to the seat-belt tower but here the harness eye-bolts are on their own. For some reason I really, really like the way this looks. Some might think its a mess, spoiling the line of the car but I like truly functional stuff on show sticking out. And the cover plates are shiny too, just a shame I didn't put the drivers one on quite lined up properly, oh well. 

Not much to say about the job itself. I had already done the hardest part a few months ago when I realised when I boxed in the rear suspension I hadn't marked where the seat belt towers come up to the body. I had to guess where they were by eye from photos of other people's cars which amazingly both sides I was within half an inch. The cover plates hide this of course. Just had to dremel a hole large enough to get the eye bolt through.


In the lower part of the above picture you can just see the second eye bolt which takes the left hand lap strap. There is a threaded boss welded on the prop shaft hoop. Unlucky for me I had put a rivet right in front of it which had to have the head dremelled away so I could get the eye bolt in.

Monday, 14 January 2013

Dashboard

Vinyl is a fabric and as such, the woman of the household made the vinyl covered dash. First job, assuming your marine ply dash is ready - cut vinyl roughly the right size.


Then, using lots of newspaper as not to ruin the floor, spray contact adhesive on the wood and the vinyl (in straight lines, 90° to each other as per instructions)


Wait 5 mins then slap the vinyl on the wood, then trim leaving enough to fold over.


Fit gauges


Fit switches, then do lots and lots of wire cutting and crimping.


et voila. One semi-authentic dash with not-quite-but-almost original layout. And wonky switches that aren't in a neat line (my fault). Disregarding the cost of the gauges and switches, total cost for dash was probably about £25 and took roughly 5 or 6 hours, most of that was head scratching whilst doing the wiring.


Saturday, 5 January 2013

Heater & Demist

I can't find any fixings for the bellhousing splash shield so we can't put the gearbox back on yet, so instead this afternoon we started putting the hoses in for the heater/demister. The tiny T7 Designs 2.2kW heater is already in, then I had a Y-splitter that takes the 60mm (2.5") outlet down to two 39mm outlets. The first bit was ok, the 60mm hose fitted on fine. I had trouble with the 39mm hose, to the point I'm not sure if bought the right diameter hose. It wouldn't go on the outlets so I rolled some thin aluminium round a socket and made the following:


The smaller hose would now go on easily, secured with a jubilee and packed with lashings of silicone.

Now, onto fitting. There is a handy bracket already in that region which holds the wiper motor so we put another hole in that, put a rivnut in the top of the plastic Y and Robert is your mother's brother.


Update 20th January, got the ducting on. I broke one of the plastic demist plenums so had to buy another one slightly different design which was mercilessly dremelled to accept the fixings from the stainless plate on top. Copious amounts of glue all over underneath to seal up and job done.


The ducting going across to the drivers side is cable tied to some self-adhesive cable-tie pads. I didnt trust the self adhesive bit so they've got some extra help from a blob of Wurth adhesive. Stainless jubilees on all ducting ends.


A couple of pics showing heater hose routing  (taken a lot later when everything was finished! )


Thursday, 3 January 2013

New Shorter Clutch Arm

New and improved clutch arm, approx 1.5 inches shorter so it doesn't clash with the chassis. Now to refit it...