It is well documented that the Eddy carbs flow barely enough fuel in the idle/transition circuit to cope with big cams. I've experienced this through the various low speed running problems. I can see from the AFR that there simply isn't enough fuel at low RPM and there is a lean surge problem.
Closing the throttles and drilling holes in the throttle blades to make the transition circuit more active helped a little bit but the trouble is that the transition circuit is fed through the idle channel restrictor so this needs to be enlarged. In Holley type carbs, Quick Fuel, Demons etc, the top-end carbs have all sorts of changeable air bleeds and jets all over the place which can be easily swapped. On the Edelbrock however its a drilled channel so the only solution is surgery. It would be possible to drill and tap and replace with something adjustable by my approach is to make tiny changes until I notice a change and leave it at that. The risk of course is going too far then changes aren't reversible if you are drilling holes.
Here is the offending area of the carb as per the Eddy manual (note 5) :

It can be accessed by unscrewing the air horn and then removing the booster assembly that sits in the idle well. You will have to remove the throttle cable and choke assembly as well.


The channel restrictor is hiding behind the pressed-in brass jobby, labelled "idle air bleed" in the manual. Removing this is easy-peasy, get a self tapping screw and wind it in to the brass restrictor then just pull it out with some pliers, in fact one of them came out by hand.


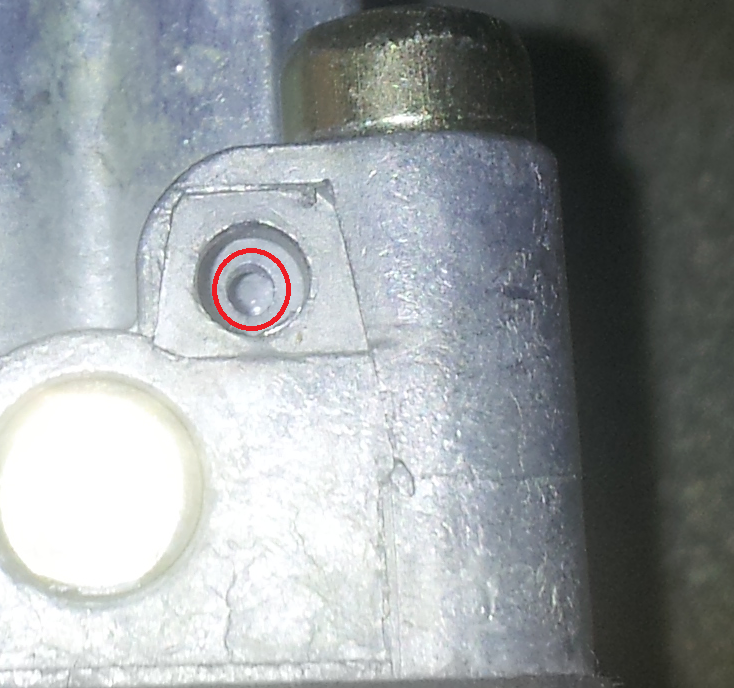
You can now see the small hole that was behind the brass restrictor. This is the ICR that we are after.

Just so we are absolutely sure what it is we're drilling, here's a close-up with it circled in red:
It's now possible to get in with a drill and open up the orifice. I don't know what size it is to begin with but I ran a 1.5mm drill through which opened it up a small amount, it didn't remove much material. Its probably best to use numbered drill bits to 1) accurately measure what it is to begin with and 2) be sure of what size you are going to and make SMALL changes - I know its a bit hypocritical saying this when I just picked up a small bit and ran it through but the point still stands, when enlarging very small holes you can make massive differences in terms of % from what seems only a small increase in diameter.
Don't forget to do the other booster before you reassemble!
Anyway - the result, I'm pleased to say I can actually feel it and can see it on the AFR gauge. Without changing the idle screw settings, the idle AFR had richened up a little bit from 13.8:1 to about 13.5:1. This means that the idle circuit as a whole is now getting more fuel.
When driving, the biggest difference was when plodding along under 2000rpm when the idle circuit is doing all the work. Before this mod I was creeping over 14:1 which was just about ok for constant throttle but if I made very small throttle adjustments of just a few mm on the pedal would send it into lean surge as it was clear the idle/transition circuit wasn't fat enough to give any extra fuel for small modulations on the throttle. These are pedal movements which are too small to get a fuel from the accelerator pump, just a couple of mm slow throttle movement.
Now that I've drilled the channel, the AFR doesn't spike lean and surge when making small throttle movements at low rpm and the general low speed manners have increased noticeably. I can give it a couple of mm throttle just to very lightly pick up speed and the AFR remains below 14:1 and lean surge is avoided so it was definitely worth doing - the way I see it in my head is that the transition circuit now has more "headroom" to cope with the many small changes in fuel demand that occur when you are cruising along gently at low rpm when the main circuit isn't fully active.
Hi there,
ReplyDeleteFound this wonderful blog while searching ICR Mods on Edelbrocks carbs. Thank you for posting pictures, this is all very helpful.
It appears since you drilled out the ICR the carb has improved on A/F ratio, has the bog went away?
Hi, I'm glad this helped someone, I was getting fed up for finding no information on this, I've seen a few vague references on forums but no concrete detail so decided to have a go myself.
ReplyDeleteThe bog I was suffering was mainly when stomping on full throttle and that was solved by adjusting the secondary air flap. This mod cleared up my low speed surge problems, and eliminated the light hesitation I was suffering when accelerating very lightly from low speed.
Both the ICR mod and the secondary air flap tuning combined together have massively improved the driveability with this carburettor.
regards
Dave
Sorry - I just re-read my response and I should clarify - the ICR mod cleared up the low speed surge and hesitation. The secondary air flap tuning solved the bog when stomping on full throttle.
ReplyDeleteThis comment has been removed by the author.
ReplyDeleteThis comment has been removed by a blog administrator.
ReplyDeleteDave,
ReplyDeleteJust curious did you change the metering rods/springs or jets? From what i gather, you have drilled the primaries, .043 acc nozzle, 1468 Acc pump, and modified the ICR to .060.
What type of drill did you use to drill out the primaries and ICR?
Sorry for so many questions.
Jared
Hi Jared for the ICR I used HSS drill bits and blew the hole out with compressed air when I had finished. For the primary throttle blades they appear to be stamped steel so I used some cobalt drill bits at very slow speed because I wanted to catch all the swarf so it didn't get in any of the passages in the carb.
ReplyDeleteJust a note on the accelerator nozzles I went back to .033 when I had properly adjusted the secondary air flap, the larger nozzle size didn't really do anything so I went back down a size, but retained the stiffer pump spring.
Did you use a dremel, pin vise or just a standard cordless drill? My cordless drill has issues with anything smaller than 1/16" or 1.5MM
ReplyDeleteI just used my cordless which can just about manage 1mm bits
ReplyDeleteExcellent write up and detailed pics. Thx
ReplyDeleteI was wondering if there was a hole when you removed the pressed in brass piece?
Did you only use the 1.5 mm drill bit or did you go bigger?
once the hole is drilled ,did you need to cover up the spot where the brass piece was?
Thx again and excellent job!
Victor
Hi Victor, the hole that I enlarged is behind the brass insert. I tried not to damage the brass insert too much when removing it. After I had enlarged the hole, I put the brass insert back in, this is possible to do with very narrow needle-nose pliers. The hole in the brass insert is way bigger than the hole behind it, not sure exactly what the function is but I thought it best to put it back in!
DeleteThx for the info. I tried it and used a 52 drill bit and made a noticeable improvement at first then after a few drives it got worse. I'll tear it apart and see if any debris is clogging a anything since I also did a rebuild while I was at it. What jets and rods are you running now?
DeleteDid you readjust your idle mixture after drilling the hole? Might need a bit of a twiddle.
ReplyDeleteI'm afraid I don't have that carb any more, I switched to a holley double pumper more suited for lightweight manual car with single plane intake